I hope this little page will show you how to change or not
bother at all and take it to a garage, when it comes to your front
suspension on a Renault Laguna.
First The Story of what happened! |
| My wife works late on a Monday-Wednesday and one Monday morning at 7am I
got a phone call from her as she set off to come home, "The car is making a
strange sound when I turn the steering wheel" came the worried cry over the
mobile. "Ok I said, well just get back here and I will have a look".
Now fortunately she only works 2.5 miles from home so I waited before taking
a shower and getting ready for work myself, the phone rang not more than 3
minutes later with "There was a loud bang and tons of smoke, and the car
said STOP" and that stop was actually 700 yards from home.
I set off wondering how much this was going to cost and met her at the golf
course and Hotel entrance that she was parked in front of, Approaching the
car something did not seem right straight away, the front drivers side look
considerably lower than the other side, puncture I thought and was right as I
approached the car and looked at the tyre, but then started to smell the
rubber in the air around me (no I had already taken off my kinky nightwear)
jacking the car up and removing the tyre revealed rubber thrown all round the
inside of the wing and a badly damaged tyre.
|
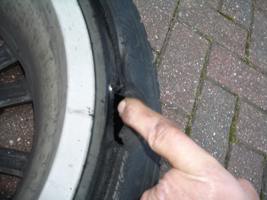
I could not workout why at first this had happened until looking at the
tyre and comparing
where the rubber had come from to the mechanics of the whole assembly, and then saw the front suspension coil spring not
where it should be, and this is in my thinking a bad design fault on the
Renault Laguna's that have conical suspension springs fitted,
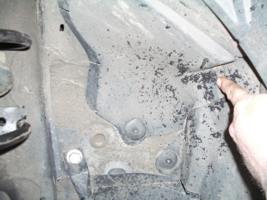
Rubber thrown around inside of wing
|
|
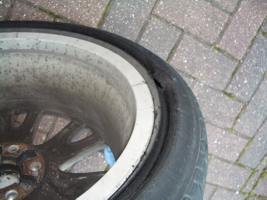
Damage to inside wall of tyreif they break
at the base (as mine did) the rest of the spring over shoots the bottom
support and drops nicely into the tyre wall, if this were to happen at
speed I dread to think what would be the outcome.
Where the hot coil spring came to rest against the tyre wall
|
|
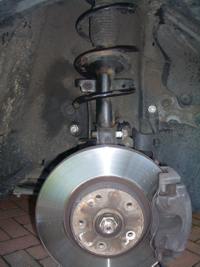
Coils springs new position
|
| Anyway After an RAC recovery and a special wheel they fit that extends
the tyre from the disc brake mounting point, the guy tells me that they are
having a lot of this type of recovery and have had for the past couple of
years, due to local councils not repairing roads (pot holes) and putting in more speed
bumps. now I won't get started on our Central Government (LABOUR) and how
they have been in power for so long and not used a penny of my or anybody
else's road tax to build new roads let alone repair them, so I'll get back
on track and show you what I did to repair the car. |
| |
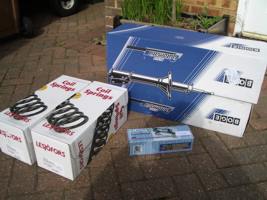
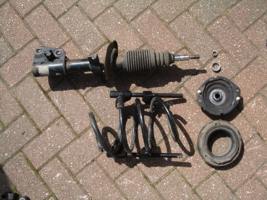
Buying the bits needed
|
|
 |
Now I know what you are thinking, why has he bought new
shock absorbers as well, simple really as I am working in this area and the prices
of new shock absorbers was reasonably cheap I thought I would replace them as well,
the car has done 82,000 miles and these have never been changed and not
wanting to get to an MOT only to find I need to change one because you
really do not want to compress those coil springs again.
|
|
So we have as follows |
| Coil Springs x 2 |
£ 73.00 |
| shock absorbers x 2 |
£112.00 |
| Coil spring Compressor Tool (a pair in the box) X 1 |
£ 25.65 |
|
Total |
£210.65 |
|
+15% vat |
£ 31.59 |
|
Grand Total |
£242.24 |
All these items were bought at 'GSF
Car Parts' the best price I could find at the time, there was eBay but I
did not want to run into problems return wrong items, as a GSF shop was
close by.you can achieve this job on your own as I did, one axel stand
and a small trolley jack, about 2 hours of work. |
| |
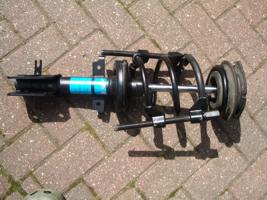
| Removing Suspension assembly (Left or Right) |
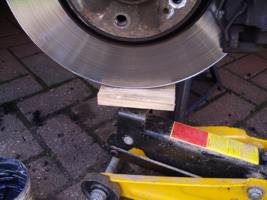
| After placing the left or right side of the car on a axel
stand, use a trolley jack with a piece of wood to protect the disc brake and
jack up the whole assembly just a bit. Tip: if you have time brush
the 3 nuts and spray with WD40 and leave for a while, makes removing them
that much easier.
 |
|
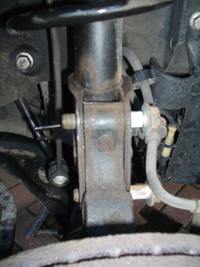
Remove the Anti-Roll bar ball and joint connection first using an allen
key and a spanner, them move this out of the way, now un-screw the two nuts
to the end of the thread that hold the shock absorber to the wheel, do not
remove the bolt yet or the nut as you will probably need to hammer these
out, never hammer an open threaded end of a bolt as you will damage the
thread and end up in a whole world of hurt.

 |
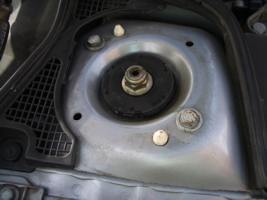
Under the bonnet locate the plastic cover above the shock absorber
mounting points and remove it, now remove the centre nut that holds a large
plastic covered metal washer.
 |
|
Remove the two outer nuts next to the nylon guides, this then completes
the mount point removal and it's back to the main strut assembly under the
wing.
 |
|
TIP: it's tricky to remove the top nut, in my case it was downright impossible, so
I re-fitted the strut and loosened the bolt a couple of turns in-situ. This was
so much easier, I would recommend it as a method whenever doing this job again.
Tip from Carol, see end of blog.
see 'top nut' below
Now lower the jack slowly until the whole assembly just begins to drop out
of the top mount point, now remove the two bolts that hold the shock
absorbers to the wheel, holding the shock with one hand to support it, when
you have removed both bolts you should be able to remove the suspension
strut from the car, if needed lower the jack a bit more.Note - if
the disc brake wheel moves to far forward it may disengage the drive shaft
from the gear box, don't worry about this as it is easy to plug it back in
later.
|
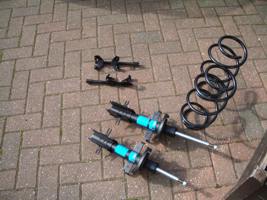
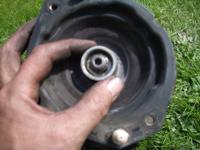
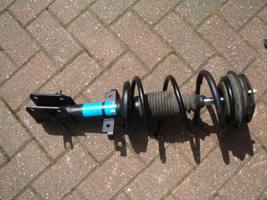
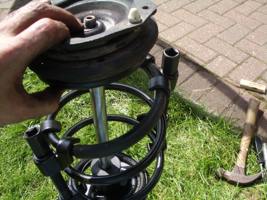
| Removing the coil springs |
| For one side at least I did not have to remove one of these but the
other side I did, and using the Spring compressors makes this an job
relatively simple although it takes a lot out of your arms, well it did
mine!
Once you have tensioned the coil enough to see the top begin to loosen
off, you can remove the top nut holding the upper mounting point in place.
 |
|
Top Nut
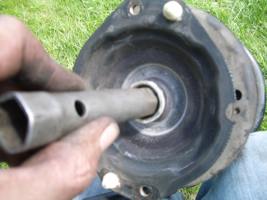 |
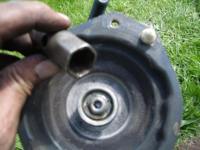
| Fiddly bit: I did not have a spanner to get into the cup
that surrounds the nut but did have an old tool that I used to great effect
and released it with no problem, but you may need a allen key to hold the
shock stem while you loosen the nut. Once you have removed the top mounting point you can remove carefully
the tensioned coil spring.
|
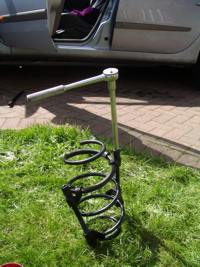
|
WARNING - Tensioned coil springs are
hazardous, it is possible that the coil spring compressors may slip sideways
trapping your skin and making you say things that kids should not hear until
they are older, as a safety precaution please make sure children are out of
ear shot. |
Be very careful removing the compressors from a tensioned spring, unwind
each side evenly until loose. |
| Reassembly of new coil spring and shock absorber. |
This is just really the reverse of all the above, re-tension the new coil
spring carefully not forgeting to remove the rubber shock absorber protector
from the main strut and fit it to the new shock. unlike me that did forget
to do this and had to re-tension the springs again to fit it. D'oh
|
|
Forgot to fit rubber cover
Fitted rubber cover |
|
Re-tensioning coil spring
Tensioned enough to fit top mounting plate back on
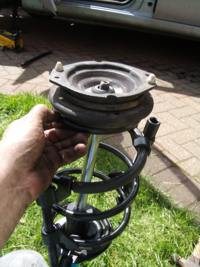
Refit holding cup and nut |
|
Located back in place with top mounting point
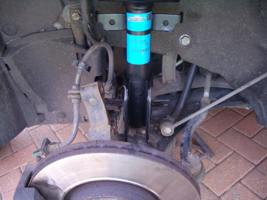
now just fit bottom mounting bolts into place. |

Using the jack, pump up the wheel disc brake to find
the right point at which you can refit the anti-roll bar
Ball and socket bolt into the shock arm mounting hole. |
| |
| I do hope this has given you an insight into replacing the
front suspension and if you feel confident enough to do it yourself then do,
you will save a lot of money that you could then use to replace the damaged
tyre with. |
| |
|
Disclaimer
I am a 50 year old IT manager and not a
mechanic, this picture tutorial is my own account of how I changed
my Front Suspension coil springs and Shock Absorbers, This may not be the
best way to do it but it is how I did it.
If you follow my suggestions and loose a limb or fingers I cannot be held
responsible.
This page is for your information only and the author (me) cannot be held
liable for any damages however they may be caused.
Following are emails sent back by people that have used this web page, and I thank you sincerely for your replies.
Jon Stynes.
Thanks for taking the time for the post concerning the Laguna shocks. I've ordered the parts and I'm going to attempt it this weekend. I'll let you know how I get on.
Mike
Hi many thanks for the info on the Laguna front spring replacement, just done mine Today after a failed MOT. Very well described, probably saved over £150 doing it myself. Plus I now have a spring commpression tool.
Pete Williams
Hi Greg,
I found your blog and used it with great ease to change the front 'legs' of my Laguna after I had a spring snap after Christmas. Before I found your blog I was going to follow the Haynes manual way of doing it but that would have been doing work that was not required. So I would like to say many thanks for your good work.
Les Hanrahan
Thanks for the instructions and pictures on Renault Laguna front spring replacement
It was very useful and I appreciate the time taken.
Thanks
Hi there, I found your site whilst trying to discover whether the spring should be fitted a particular way up, as the ends aren't the same (one end has a tighter coil). Do you know by any chance?
I think the tighter coil end is at the top to support the rubber cup
Update
Hi Greg, by trial and error I found that the tighter coil goes at the bottom, otherwise it pinches onto the top end rubber. You may want to include that also, cheers, Carol.
The other thing is a tip - As you found, it's tricky to remove the top nut, in my case it was downright impossible, so I re-fitted the strut and loosened the bolt a couple of turns in-situ. This was so much easier, I would recommend it as a method whenever doing this job again.
Cheers,
Carol
Douglas Kent
Thanks, Greg, excellent description on how to change the spring.
The only bit I had a bit of trouble with was removing the nut at the top of the spring as I did not have a box spanner of the correct size (17mm). However I bought a ‘Deep socket’ from Halfords for £6.99 which fitted.
I slackened the nut before removing the strut from the car, as suggested by Carol, and had no problem with the internal shaft turning. (If it had, I was intending to file two flats on the socket with an angle grinder, so that I could use an open ended spanner on the socket, while inserting an Allen key down the centre.)
I did the final tightening of the nut when it was back on the car, and again had no problem with the shaft turning.
Roy
Hi Greg,
I wheel and deal a little with cars over here in Yorkshire UK. Thanks very much for your blog on the above suspension strip.
I found it very helpful indeed on a car I have just been working on. Your efforts are much appreciated
.
Jim Higgins
many thanks for your info' page, it was a God- send.
I kept doing bits, coming in and check your blog and renewed the broken spring in couple of hours.
Very happy wife and my wallet !!!!!!!!!
Thanks for your posting.
Phil Lowe
Hi Greg
Would just like to say thanks for your well explained blog on the removal and refitting of the coil springs
I had the exact same happened to me at speed 70mph on a dual carriageway (spring through sidewall of tyre) Luckily there was no traffic at the time as the car came to a stop almost instantly
My opinion is that some serious incident will occur -Renault should be held responsible for this, If i had taken my partner to work in the busy morning traffic, I reckon i would not be here to tell the tale
You made the job easy with your photo images i appreciate it.
Mike Price
Hi Greg
Thanks for the step by step description of the repair.
It did amuse me. I am in my fifties, work in IT, have a wife called Liz and my wife drove a couple of hundred metres and reported the car not feeling right! We drove it back round the corner and there was a smell of burning rubber.
Thanks to your excellent guide I have repaired the broken spring myself.
I chose to repair just the one spring and didn't replace the shocks.
Total cost of parts: £18.95 for the spring and £14.84 for a stabiliser link (mine was bent) = £33.79 Total cost of tools: spring compressors (Screwfix) £17.99 + deep 17mm socket
(Halfords) £6.49 = £24.48
When I first tried I had great difficulty trying to undo the nut holding on the link stabiliser. I gave it a good squirt of WD40 and left it overnight.
Following morning it came of very easily.
Thanks again
Robert Fleming
Great step by step guide, the spring on Laguna went last week, your guide helped massively. I'd just add that the tricky nut at the top of the shock absorber needs a deep 17mm socket, I found one at my local auto factors. The springs were hard work particularly as I was being thick and hadn't pulled the shock absorber up to its highest position after about an hour of trying to tension the springs to a stupid amount and the tensioners flying off a couple of times I realised DOH!
Thanks Robert for your contribution, Greg
William White
Just wanted to say thanks for the Laguna coils spring replacement article.
Just a couple of things I wanted to add for those intending to change a spring on the Coupe, ( not sure if the same on the saloon/estate ) the two main lower bolts ( 2011 Coupe ) are splined into the strut and hub carrier, and there is quite a lot of dismantling under the bonnet before the three top carrier bearing mount bracket bolts can be exposed to loosen..
The “gutters” that channel water either side of the bonnet, and the two trays at the rear of the engine compartment, both window wipers and wiper motor retaining mount strengthening bracket ( drivers side ) will need removed also. Mark where the wipers sit with a piece of tape onto the glass before removal, to aid refitting..
Also check that the top bearings rotate freely, as these can be a cause of spring fatigue/failure..
I was going to get my mechanic son help me, but following your article I braved it myself, and completed replacing both springs ( only one damaged, better to replace in pairs ) in approximately 2 1/2 hours.
Regards,.
Willy
|